Is your drone remote control refusing to link, flashing a red light, or showing ‘Connection Lost’ on the screen? This guide walks you through the exact steps to diagnose and fix the issue, from simple radio interference to a damaged internal antenna. You’ll learn the root causes, when you can fix it yourself, and when to call a pro.
What’s Happening — Symptoms in Detail
You power on your drone and remote, but they simply won’t connect. The screen on the remote might display ‘No Signal’, ‘Connection Lost’, or a blinking red LED on the power button. Some users report a solid green light on the remote but no response from the drone, while others see rapid flashing on both devices.
This failure can happen at different times:
- On startup: You bind the remote for the first time and nothing happens.
- After a crash: The drone landed hard, and now the link is broken.
- During a firmware update: The update failed, leaving the radio module in an incompatible state.
- After a long storage period: The remote worked months ago, but now it won’t link.
The problem often progresses from intermittent connection drops to a complete failure. You might notice the video feed freezing or the drone responding with a delay before it stops responding entirely.
How to Diagnose the Problem Step by Step
Power Cycle Both Devices: Turn off the remote and drone completely. Remove the batteries from both for 30 seconds. Reinstall and power on the remote first, then the drone. Normal: the remote’s LED turns solid green within 10 seconds. Abnormal: the LED continues to flash red or green.
Check the Binding Procedure: Most drones require a specific bind sequence. For a DJI Mini 4 Pro, press and hold the power button on the drone until you hear a beep, then press the FN button and C1 button on the remote simultaneously. Normal: the remote beeps and the LED turns solid. Abnormal: no beep or the LED flashes rapidly.
Inspect for Radio Interference: Move to an open area away from Wi-Fi routers, power lines, or other drones. Try connecting again. Normal: the link establishes. Abnormal: still no connection, indicating a hardware or firmware issue.
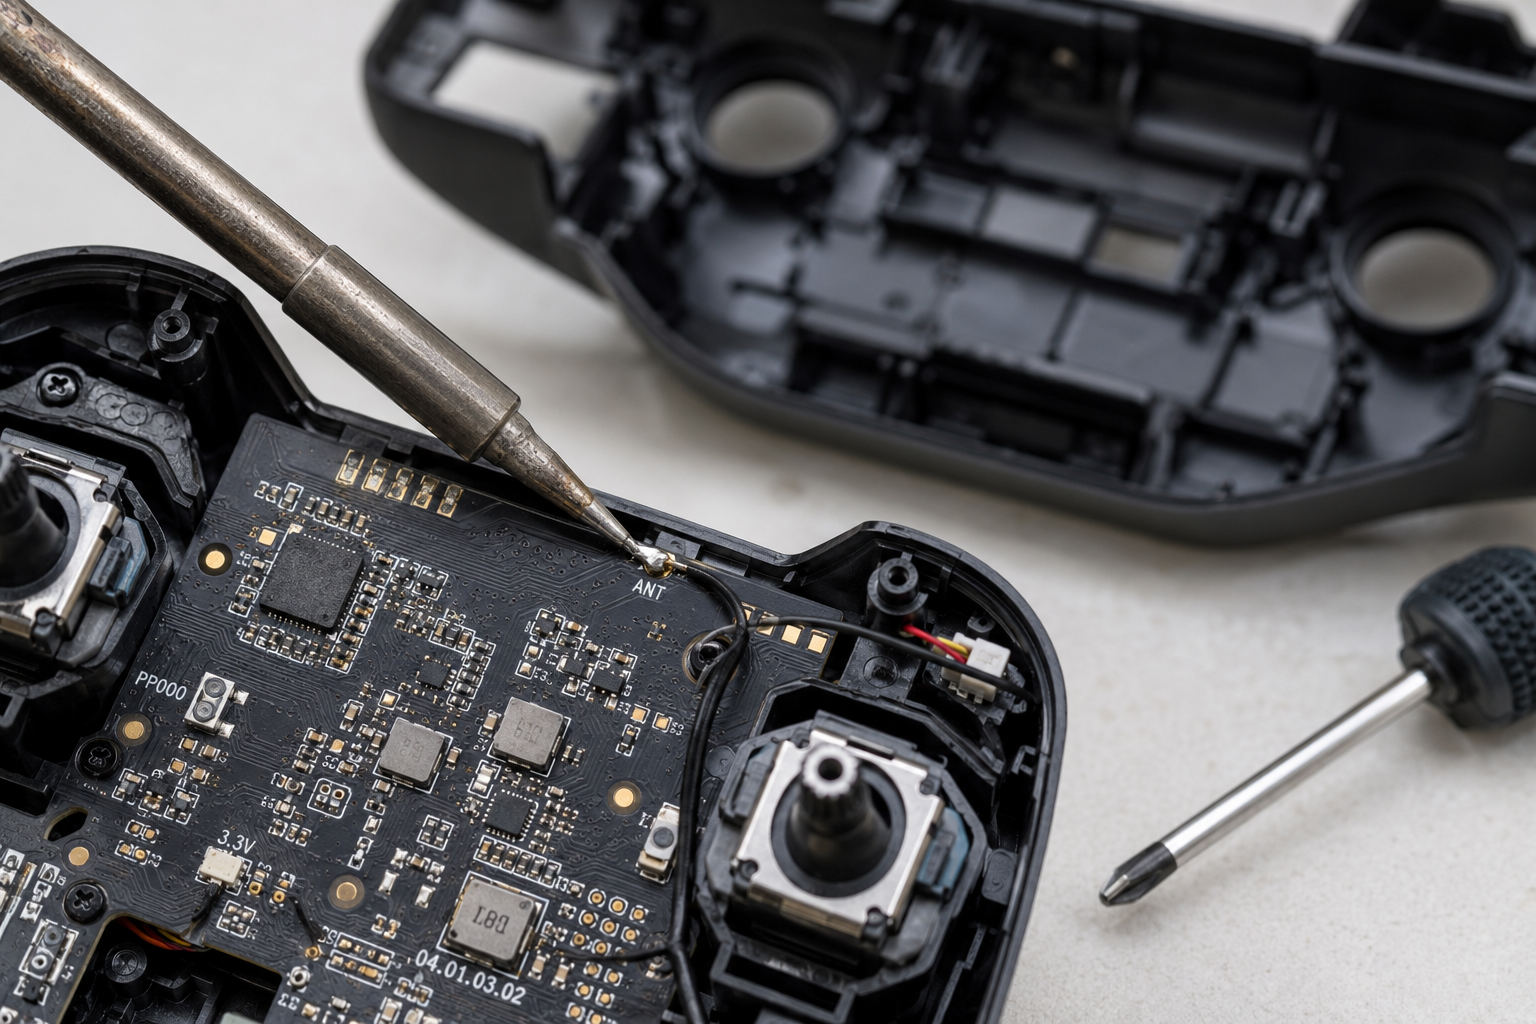
Check the Remote’s Antenna: Visually inspect the antenna on the remote. Normal: it’s straight and undamaged. Abnormal: the antenna is bent, cracked, or missing. A damaged antenna can’t transmit or receive signals effectively.
Check the Drone’s Receiver: Open the drone’s body (if comfortable) and locate the receiver module. Look for loose wires or a disconnected antenna. Normal: the antenna is securely attached to the receiver board. Abnormal: the antenna wire is detached or the receiver board has visible damage.
Test with a Spare Remote or Drone: If possible, try binding your remote with a different drone, or your drone with a different remote. Normal: the spare works, meaning your original device is faulty. Abnormal: neither works, pointing to the drone’s receiver as the culprit.
Why This Happens — Root Cause
The radio link between your remote and drone relies on a 2.4GHz or 5.8GHz frequency. The remote’s internal radio module sends a signal through an antenna, which the drone’s receiver module picks up. A failure in any of these components breaks the connection.
Common causes include:
- Physical damage to the antenna: A crash can shear the antenna wire inside the remote or drone. The antenna is often a thin, fragile wire soldered to the board. Without it, the signal range drops to zero.
- Firmware corruption: A failed update can leave the radio module in a boot loop. The remote and drone use specific firmware versions to communicate. If they mismatch, binding fails.
- Receiver module failure: The drone’s receiver board can be damaged by a power surge, static discharge, or moisture. This is common after a crash that shorts the battery terminals.
- Battery voltage issues: If the remote’s battery is below 3.3V per cell, the radio module may not have enough power to transmit. This often happens after long storage.
- Radio interference: Crowded 2.4GHz bands from Wi-Fi or other drones can prevent a link. This is temporary but frustrating.
Can You Fix It Yourself?
- Difficulty Level: 3 out of 5. Basic soldering and disassembly are required for internal repairs.
- Time Required: 30 to 90 minutes, depending on the issue.
- Skill Level Needed: You need to be comfortable with a screwdriver (Phillips #00) and a soldering iron (25W or higher). If you’ve never soldered before, this is a moderate challenge.
- Risks: Damaging the ribbon cables inside the remote or drone. Overtightening screws can strip the plastic threads. Soldering the wrong wire can short the board.
- Tools Required:
- Phillips #00 screwdriver
- Soldering iron (25W) with fine tip
- Solder (0.032-inch diameter)
- Multimeter (to check continuity)
- Tweezers (for handling small wires)
- Isopropyl alcohol (for cleaning flux residue)
Cost Breakdown — DIY vs Professional
- DIY Cost:
- Replacement antenna: $5 to $15 (eBay or Amazon).
- Replacement receiver module: $20 to $50 (part number depends on drone model).
- T Plug Male Female Connectors Adapter: $3.41 (if you need to replace the battery connector).
- Soldering iron and solder: $20 to $40 (if you don’t already own them).
- Professional Repair Cost:
- Diagnostic fee: $30 to $50 (often waived if you proceed with repair).
- Antenna replacement: $40 to $80 (including labor).
- Receiver module replacement: $60 to $120 (including labor).
- When to Skip DIY: If the drone’s main board is damaged (not just the receiver), or if you lack soldering experience. Also, if the remote is still under warranty, send it to the manufacturer.
Repair Process Overview
Power off and disassemble the remote: Remove the battery and all screws (typically 4-6 Phillips #00). Pry open the case carefully using a plastic spudger to avoid breaking the clips.
Locate the radio module: Inside, you’ll see a small board with a metal shield. This is the 2.4GHz radio module. The antenna wire is soldered to a pad on this board.
Inspect the antenna connection: Normal: the wire is firmly soldered. Abnormal: the wire is detached, or the pad is lifted. If detached, strip 2mm of the wire, tin it with solder, and reattach to the pad. Use a multimeter in continuity mode to verify the connection.
Replace the receiver module (if needed): If the antenna is fine, the receiver module on the drone may be faulty. Disassemble the drone, locate the receiver board (often near the main flight controller), and unplug the ribbon cable. Install the new module and reconnect.
Reassemble and test: Close the remote and drone, power them on, and attempt to bind. Normal: the LED turns solid green. Abnormal: repeat the diagnosis steps.
After the Repair — Testing & Verification
- Verify the link: Power on both devices and confirm the remote’s LED turns solid green within 10 seconds.
- Test the range: Walk 50 meters away with the drone on the ground. The connection should remain stable.
- Monitor for intermittent drops: Fly the drone in a safe, open area for 5 minutes. Watch for any brief disconnections or control lag.
- Check for overheating: After 10 minutes of use, feel the remote’s back. It should be warm, not hot. Excessive heat indicates a short or a failing component.
Parts You’ll Need
Here are the parts that match this repair. Click the link to check the current price on AliExpress.
| Product | Price |
|---|---|
| T Plug Male Female Connectors Adapter… | $3.41 |
Prices and availability are subject to change on AliExpress.