This guide addresses drone motors that fail after a crash, showing symptoms like grinding noises, failure to spin, or erratic flight. It provides a step-by-step diagnosis to confirm motor damage, explains why motors fail mechanically, and gives a clear DIY replacement process with cost comparisons.
What’s Happening — Symptoms in Detail
After a hard landing or crash, you may notice one or more motors refuse to spin when arming the drone. Some users report a high-pitched grinding or scraping sound when manually rotating the motor bell, while others see the motor twitch but not spin up during pre-arm checks. On some models, like the DJI Mini 3 Pro or FPV drones running Betaflight, you might get a ‘Motor Failed’ or ‘ESC Error’ on the OSD or in the DJI Fly app. The issue often appears immediately after impact, but can also develop over the next few flights as a bent shaft worsens. Progressive symptoms include the drone yawing violently during takeoff, a persistent vibration in the video feed, or the drone flipping on its back as soon as you throttle up. In rare cases, the motor spins freely but the drone drifts in one direction, indicating a desynchronized or shorted motor winding.
How to Diagnose the Problem Step by Step
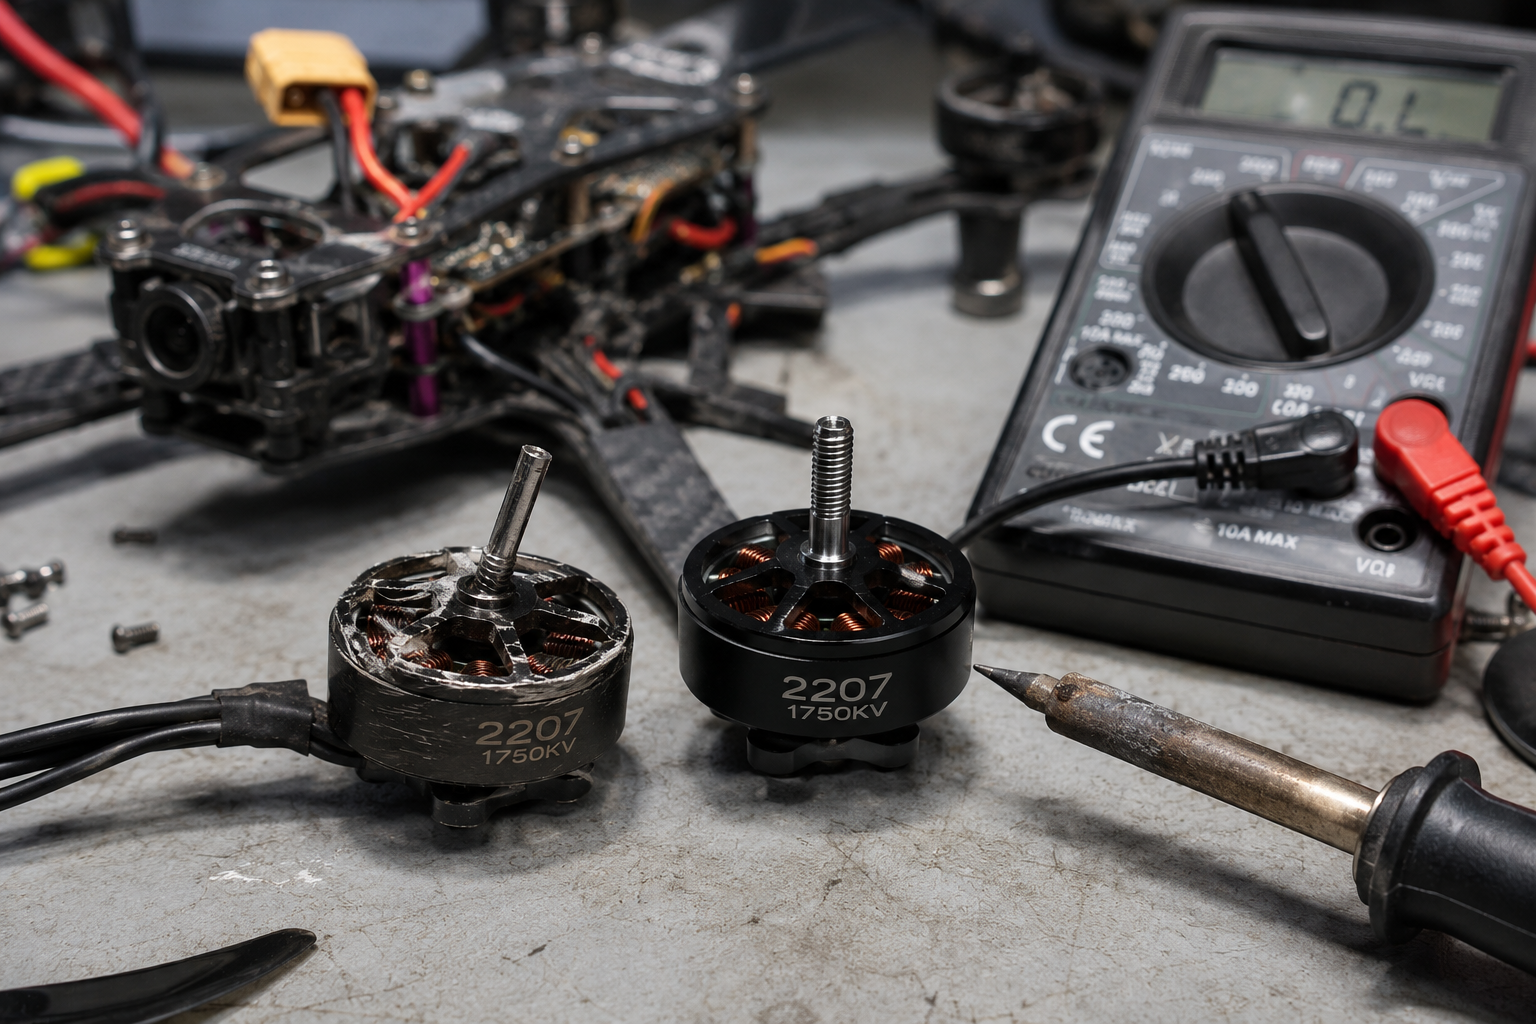
- Visual Inspection: Remove all propellers. Look at the motor bell (top spinning part) for dents, cracks, or a gap between the bell and base. Normal: bell is perfectly round and flush with the base. Abnormal: bell is oval, tilted, or has a visible dent. 2. Manual Rotation Test: Gently spin each motor by hand. Normal: smooth, frictionless spin with a slight magnetic cogging feel. Abnormal: grinding, scraping, or a gritty sensation. If one motor feels much harder to spin or makes a scratching sound, the bearings are damaged. 3. Motor Screw Check: Use a 1.5mm hex driver to ensure all four motor mounting screws are tight. A loose motor can mimic a bearing failure. 4. ESC Communication Test (Advanced): Connect the drone to Betaflight Configurator (for FPV drones) or use the DJI Assistant app. Go to the Motors tab, remove props, and spin each motor individually at 10% throttle. Normal: all motors spin up smoothly and stop instantly. Abnormal: one motor stutters, fails to spin, or spins at a different speed. 5. Resistance Check (Advanced): Use a multimeter set to ohms (Ω). Measure resistance between any two of the three motor wires (solder pads). Normal: all three pairs show the same resistance (e.g., 0.5-2.0Ω for most 2205-2207 motors). Abnormal: one pair shows infinite resistance (open winding) or near zero (short). Any imbalance above 0.2Ω indicates a failing motor.
Why This Happens — Root Cause
The primary failure mode after a crash is physical deformation of the motor’s bell housing or shaft. When the drone strikes an object, the inertia of the spinning propellers can bend the motor shaft, causing the bell to rub against the stator (the stationary copper windings inside). This creates the grinding sound and increases resistance. Over time, the rubbing wears away the thin enamel coating on the copper windings, causing a short circuit that the ESC detects as a ‘Motor Failed’ error. A second common failure is bearing damage: the small ball bearings inside the motor base can crack or lose their lubricant on impact. This allows radial play (wobble) in the shaft, which again causes rubbing and eventual electrical failure. Dust and sand accelerate this: if you flew in a dusty environment before the crash, grit can already be inside the bearings, making them brittle. Heat is a multiplier—motors that run hot (above 80°C) have weaker magnets and softer shaft steel, making them more prone to bending. Specific models like the DJI Mini 4 Pro use 0805 bearings that are particularly fragile; even a drop from waist height can dent the bell.
Can You Fix It Yourself?
Difficulty: 3 out of 5. This is not a beginner repair because it requires desoldering three motor wires and soldering new ones. Time required: 30-60 minutes for one motor. Skill level: you must have basic soldering experience (joining wires, not just through-hole). Risks: (1) Soldering iron heat can damage the ESC if you hold it on the pad too long (>5 seconds). (2) Reversing any of the three motor wires will make the motor spin the wrong direction, causing the drone to flip on takeoff. (3) Overtightening motor screws can strip the threads in the aluminum arm. Tools required: soldering iron (350°C), solder (63/37 rosin core), 1.5mm hex driver, tweezers, multimeter, and electrical tape or heat shrink. You do not need a hot air rework station.
Cost Breakdown — DIY vs Professional
DIY cost: A replacement motor for most 2205-2207 size drones costs $10-$20. For DJI Mini series, OEM motors are $15-$25 each. The available parts in this guide (propellers) are not for motor replacement—they are for after the repair. For example, Part #1 (8PCS 6030F Propellers at $4.33) or Part #2 (4 Pieces Propellers at $2.28) are needed to complete the drone after motor installation. Professional repair: A drone repair shop charges $30-$50 for diagnosis (often waived if you proceed), plus $20-$30 for the motor and $40-$60 labor for soldering and calibration. Total pro cost: $60-$110 per motor. Skip DIY if you have no soldering experience or if the crash also damaged the ESC (the ESC would need replacement too, doubling complexity). If the drone is under warranty, contact the manufacturer first.
Repair Process Overview
The repair involves: (1) Removing all propellers and the drone shell (typically 8-12 screws). (2) Desoldering the three motor wires from the ESC board. Use a solder sucker or wick to remove old solder. (3) Unscrewing the four motor mount screws (1.5mm hex) and removing the old motor. (4) Installing the new motor with the same screws—apply threadlocker (blue Loctite) to prevent loosening from vibration. (5) Soldering the three motor wires to the ESC pads. The order does not matter yet, but note which pad is which for later. (6) Reassembling the shell. (7) Testing motor direction in the flight controller software (Betaflight or DJI app). If a motor spins wrong, swap any two of its three wires. Common mistakes: (1) Forgetting to apply threadlocker—motors can unscrew mid-flight. (2) Soldering with a cold joint (dull, grainy appearance) that breaks during flight. (3) Reversing the wire colors (red/black/yellow) is irrelevant; only the physical order matters.
After the Repair — Testing & Verification
After reassembly, perform a no-propeller test: arm the drone and slowly increase throttle to 20%. Listen for smooth, even sound from all motors. Then install new propellers (e.g., the 6030F set from Part #1) and do a hover test in a safe indoor area. Watch for any yaw drift or vibration in the camera feed. For the first 10 minutes of flight, land every 2 minutes and touch each motor bell—if one is significantly hotter than the others, the motor is overworking and may have a misalignment. If the drone flies perfectly, the repair is complete.
Parts You’ll Need
Here are the parts that match this repair. Click the link to check the current price on AliExpress.
| Product | Price |
|---|---|
| 8PCS 6030F Propellers Blade Low Noise… | $4.33 |
| 4 Pieces Propellers,,Lightweight Fold… | $2.28 |
| 4pcs Colourful TELLO Propeller Quick … | $2.05 |
Prices and availability are subject to change on AliExpress.