This guide helps DJI Mini 4 Pro owners diagnose a broken or damaged arm and decide whether to repair it themselves or seek professional help. It covers symptoms, root causes, and step-by-step repair steps.
What You’re Experiencing
You notice the drone won’t fly straight, one arm feels loose or wobbly, you hear a cracking sound after a crash or hard landing, or the drone tilts to one side during flight. The affected arm may not fold or unfold properly, and you might see a ‘Gimbal Overload’ or ‘Motor Error’ message on the controller screen.
How to Diagnose the Problem
- Power off the drone and remove the battery for safety. 2. Visually inspect each arm for cracks, dents, or deformation, especially near the hinge and motor mount. 3. Gently try to flex each arm—if one moves more than the others, it’s likely broken. 4. Check the arm’s folding mechanism: if it doesn’t lock into place or feels loose, the internal hinge is damaged. 5. Power on the drone (with props removed) and check the motor on the suspect arm—if it vibrates or doesn’t spin smoothly, the arm or motor mount is compromised. 6. Use a multimeter to test continuity of the motor wires if the arm is non-responsive.
Why This Happens
The DJI Mini 4 Pro arms are made of a lightweight plastic composite that can crack or snap under stress from crashes, hard landings, or even repeated folding/unfolding. The hinge mechanism inside the arm can also wear out or break, causing the arm to become loose. The motor mount is integrated into the arm, so a broken arm often means the motor alignment is off, leading to flight instability.
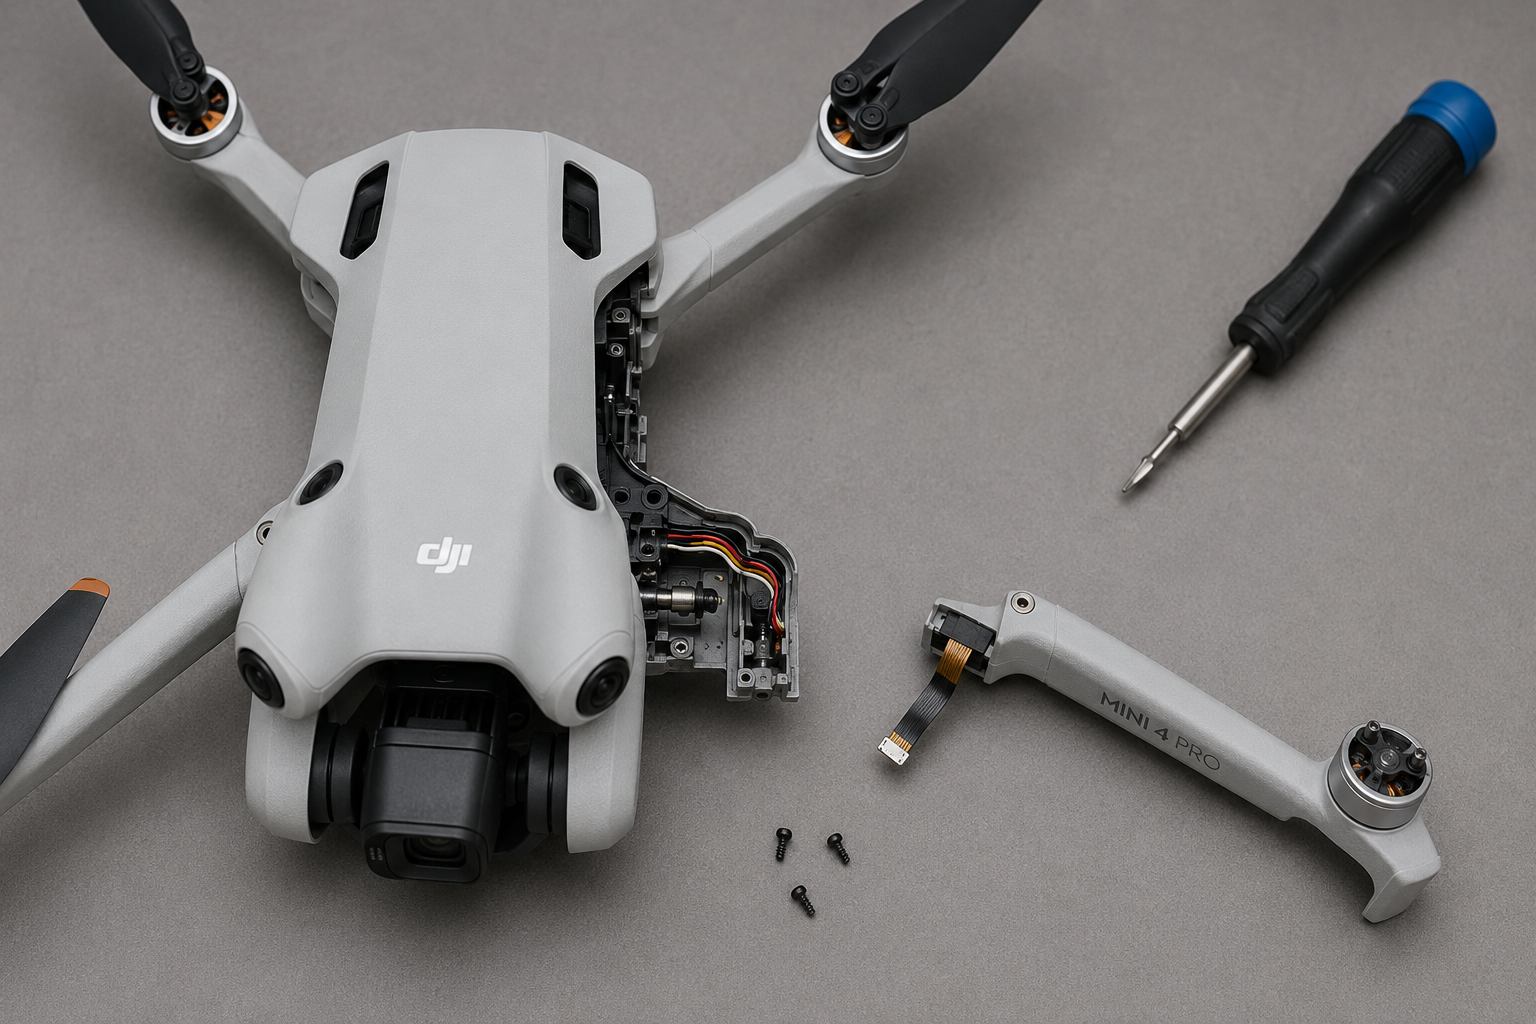
Can You Fix It Yourself?
Replacing a broken arm on the Mini 4 Pro is a moderate difficulty repair (3 out of 5). You’ll need to remove the top shell, disconnect the motor wires from the main board, and replace the entire arm assembly. The process takes about 30-45 minutes if you have the right tools. No soldering is required if you replace the arm with a complete assembly that includes the motor.
Cost Breakdown
DIY repair cost: Approximately $10-$20 for a replacement arm and a basic screwdriver set. Professional repair shop cost: $50-$100, including labor and markup. If you’re handy with small electronics, DIY is much cheaper. If you’re unsure or the drone has other damage, professional repair may be safer.
How to Confirm the Arm is Really Broken
Before ordering parts, do a thorough check. Sometimes what feels like a broken arm is actually a loose screw or a misaligned hinge. Remove the battery and inspect the arm from all angles. If you see a hairline crack, it will only get worse. Test the arm by gently applying pressure in the direction it would fold—if it bends more than the other arms, the plastic is fractured. Also, check the motor wires: if they are pinched or cut, that can cause motor errors. If the arm is intact but the motor is faulty, you only need a motor, not the whole arm.
Tools You’ll Need for the Repair
You’ll need a small Phillips head screwdriver (PH0 or PH00), a plastic spudger or guitar pick to open the shell, and tweezers to handle small wires. Optional but helpful: a magnetic screw mat, a bright work light, and a pair of needle-nose pliers. If you don’t have these, a basic electronics repair kit from Amazon costs around $10. Do not use metal tools to pry open the shell—you’ll scratch the plastic.
Step-by-Step Arm Replacement Overview
- Remove the 4 screws on the bottom of the drone and gently separate the top shell. 2. Disconnect the battery connector and the ribbon cables connecting the gimbal. 3. Locate the motor wires for the broken arm—they are soldered to the main board or have a small connector. 4. Desolder or unplug the wires (depending on your drone version). 5. Remove the 2 screws holding the arm hinge to the frame. 6. Lift out the old arm assembly. 7. Install the new arm, ensuring the hinge clicks into place. 8. Reconnect the motor wires (solder or plug in). 9. Reassemble the shell and test the arm’s movement before flying. For a full video tutorial, search ‘Mini 4 Pro arm replacement’ on YouTube.
Parts You’ll Need
| Part | Price | Why You Need It |
|---|---|---|
| Original Repair Parts For Mini 4 Pro Core motherboard GPS Gimbal Ca… | $0.77 | This is a complete arm assembly with motor, which simplifies the repair—no need to transfer the motor from the old arm. |
| For Mini 3Pro Gimbal Parts with Motor Arm Yaw Roll Motor GPS ESC Ob… | $1.64 | If your drone’s motherboard or gimbal was also damaged in the crash, this part may be needed, but for arm-only issues, it’s not required. |
| Original Mini 3pro Drone Accessories Enclosure Motor Arm Gimbal Yaw… | $1.50 | This is a gimbal part, not an arm, but if your gimbal was also affected, you might need it. For pure arm replacement, focus on Part #3. |
| For DJI Mini4Pro Gimbal Housing PTZ Signal Cable Camera Frame Cap Y… | $2.03 | Replacement part for your repair |
| Mini 3 Shell with Engine Motor Arm Gimbal Yaw Motor GPS ESC Cable P… | $1.46 | Replacement part for your repair |
| For DJI MINI4Pro Left right front rear arm arm pole with cable ante… | $2.09 | Replacement part for your repair |
If you have basic soldering skills and patience, DIY arm replacement on the Mini 4 Pro is a cost-effective fix. Otherwise, pay a pro to avoid further damage.